Corporate Logo

Recent Posts

  • 3D Pumpkin Sculptures – Halloween 2017
  • DIY: How to make your own Smartphone Tripod Mount (iPhone or Android)
  • DIY: How to make your own Smartphone Stand (Samsung Galaxy Note 3) – It’s as easy as 1-2-3
  • DIY Tutorial – How to modify and use an Egg Timer for Time-Lapse Videos and Panoramic Photographs
  • DIY Tutorial: How to make a Mini Digital Boombox (sans speakers) for cheap – using a Lepai Amplifier & a Behringer DAC

Categories

  • About Us (1)
  • Audio (3)
  • Fun Stuff (3)
  • Photography (2)

About Me:


I’m an IT Consultant, specializing in:

  • Business Analysis,
  • Business Systems Analysis,
  • Business Intelligence Analysis,
  • Enterprise Reporting & Automation,
  • Business Process Improvement,
  • Microsoft Office Training & Automation,
  • Sage ACT! (CRM) Implmentation & Training,
  • CMS-Based Web Development,
  • Android Automation

You could also say that I’m an Audiophile, with a special interest in tweaking and collecting Vintage Audio. I also enjoy building things myself.

Some of my other interests are:

  • Photography
  • Technology (Linux, Android etc.)

Recent Technology Posts:

No posts found.

Recent Photography Posts:

DIY: How to make your own Smartphone Tripod Mount (iPhone or Android)

DIY Tutorial – How to modify and use an Egg Timer for Time-Lapse Videos and Panoramic Photographs

Recent Audio Posts:

DIY Tutorial: How to make a Mini Digital Boombox (sans speakers) for cheap – using a Lepai Amplifier & a Behringer DAC

Tutorial: How to setup an Awesome-Sounding, More-Portable, Open Boombox using a Raspberry Pi and Squeezeplug (v2)

Tutorial: How to setup an Awesome-Sounding, Semi-Portable, Open Boombox using a Raspberry Pi and Squeezeplug (v1)

Some Fun Stuff :-)

3D Pumpkin Sculptures – Halloween 2017

DIY: How to make your own Smartphone Stand (Samsung Galaxy Note 3) – It’s as easy as 1-2-3

Stress Busters – 80’s Retro Games

  • Home
  • Prices and Order Information
  • Photo Gallery
  • Products
    • Line 2CRM Line Preamplifier
    • Phono 3C Phono Preamplifier
    • Super Stealth+ Monobloc Power Amplifier
  • Reviews
  • Contact
  • User Manuals
  • Customer Feedback
Home » 2013 » July

Tutorial: How to setup an Awesome-Sounding, Semi-Portable, Open Boombox using a Raspberry Pi and Squeezeplug (v1)

In this post I’ll show you how to setup a somewhat-portable, open-style boombox which (to say the least) will “blow-your-brains” (as well as that of your friends and neighbours).

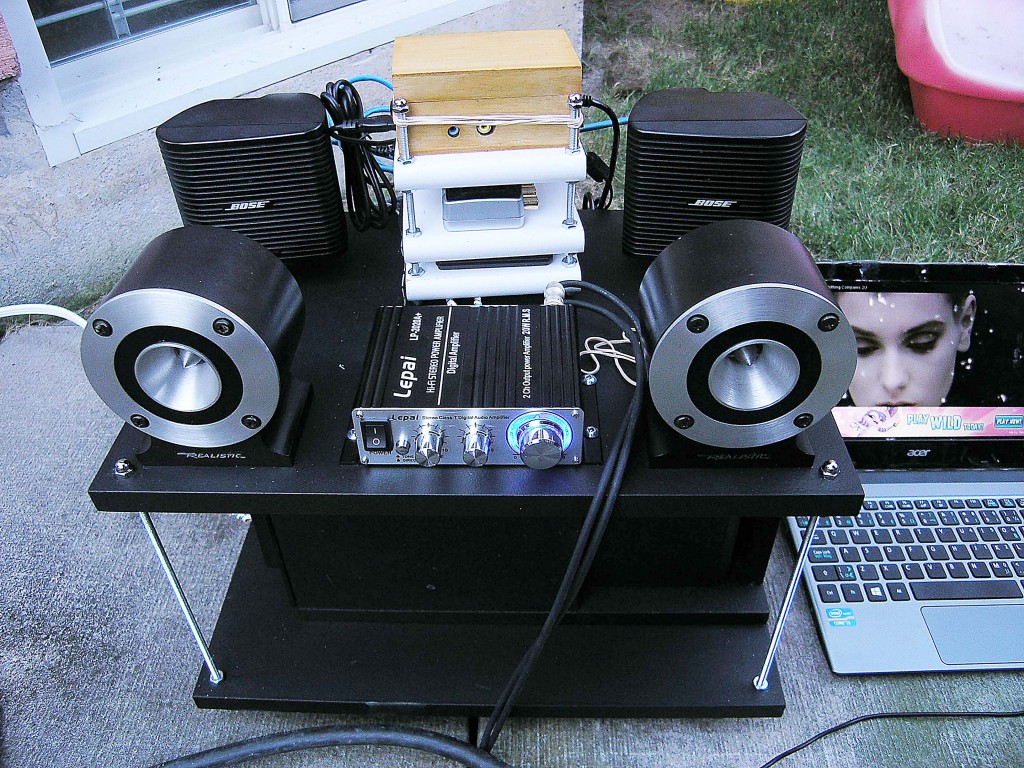
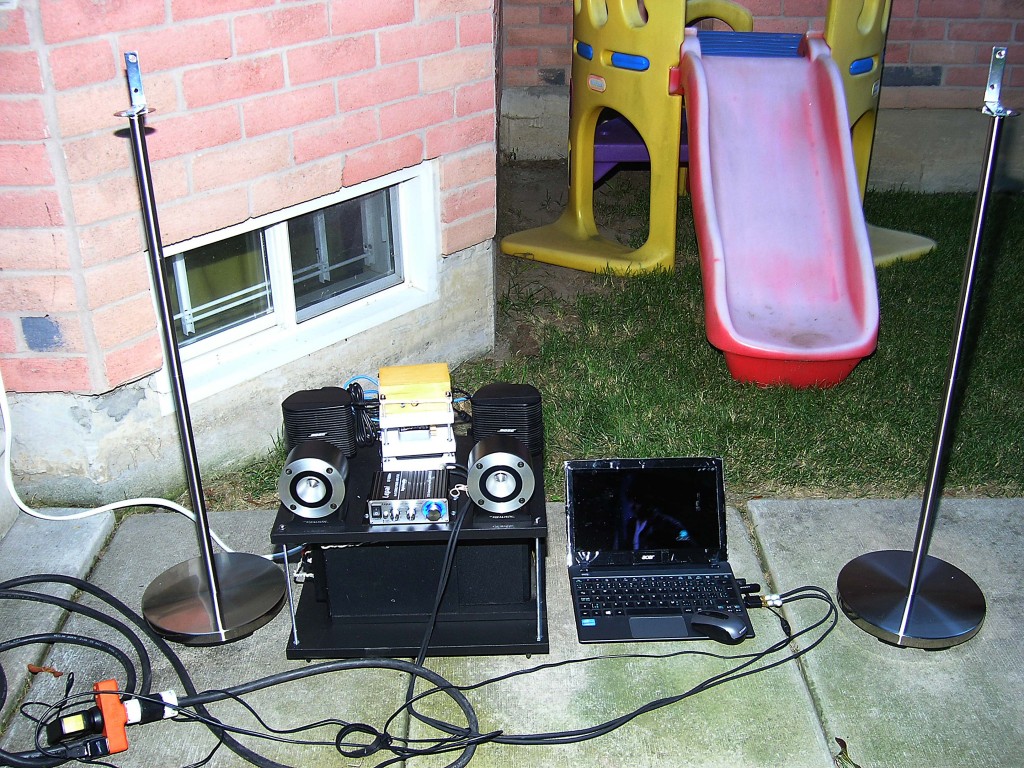
As the saying goes, “a picture speaks a thousand words”, so here’s what you’re trying to achieve:

Assumptions/Prerequisites:

In this tutorial I’m assuming that you already have a Raspberry Pi configured and up-and-running (in wireless mode), and that the operating system installed is Raspbian Wheezy.

Before starting, I must say that while working on projects such as this, I normally take pictures of every step I perform (so that I’m able to make it easier for you to understand/follow), but since I was in a hurry to complete this project (had to get it ready for a backyard party in a very short time) I couldn’t afford to spend the time clicking pictures. That being said, I will still try to make it as simple and easy to understand as possible, whilst using just text.

This is a late edit: I was able to create a new mini-rack (using hobby Poplar wood instead of MDF) for my R-Pi stack, and for the new project I was able to click pictures along the way (more or less). You may want to read and/or complete that project before you get to this one, since it will give you a better idea of how to put together the “DIY Flexy Rack”, which is required for this project as well.

With that out of the way, let’s get to work, shall we?

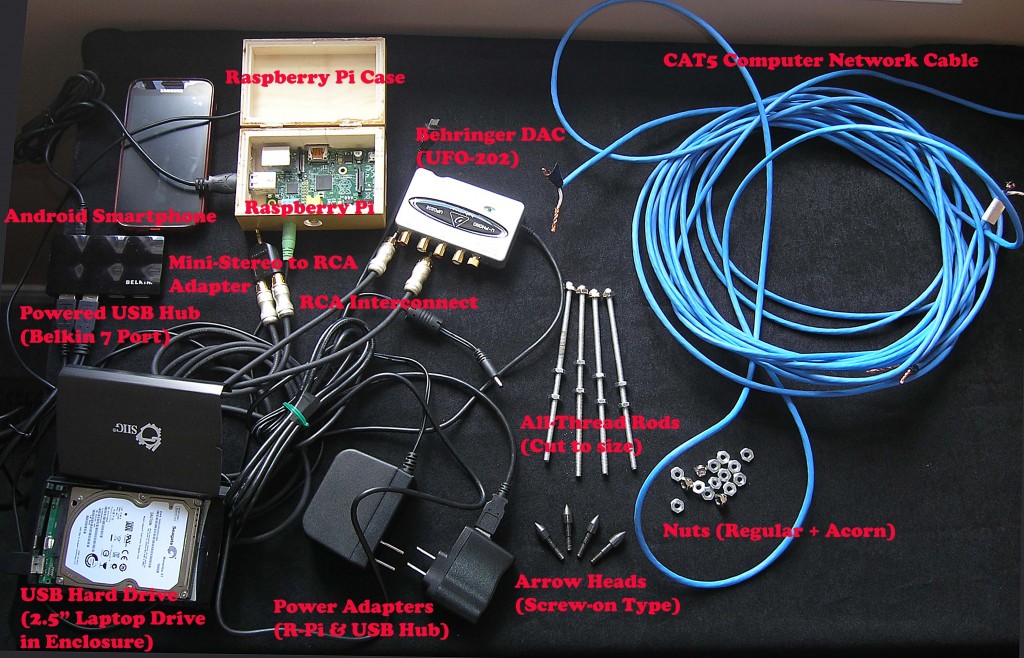
Things you’ll need, in no particular order:

  • 1 Raspberry Pi, along with the following:
    • 1 Power Adapter for Raspberry Pi
    • 1 Case for Raspberry Pi – I made my own case using a Dollar store wooden box (crafts section)
    • 1 SD Card – preferably 4GB or more
    • 1 WiFi Dongle – I use the TP-Link TL-WN725N
  • 2 Full-Size All-thread Rod(s)
  • 12 Regular Nuts (thread size suitable for all-thread rod above)
  • 4 Acorn Nuts (— as above —)
  • 4 Arrow Heads (with threads)
  • 1 Plank of 1/4 inch MDF (or other wood of your choice – balsa would be great, but MDF is the least resonant and therefore most ideal, IMHO)
  • 1 Powered USB Hub – The smaller the better; 4 port should suffice, though mine has 7 ports
  • 1 DAC (Digital-to-Analog Converter) – I used the Berhinger U-Phono UFO202
  • 1 USB Pocket Drive – I used the aData NH92
  • 1 Mini Stereo Amplifier – I used the Lepai Class-T Mini Stereo Digital Amplifier LP-2020A+
  • 1 set RCA Interconnects
  • 1 Power Extension Box
  • 2 Screws for Power Extension Box (Screw head must be small enough to go through the wider portion of extension box hole – on rear side – but large enough to not fit through the narrowest portion of the hole)
  • 1 Satellite-style speaker system (with Bass module) – I used my 25 year old Bose AM-3’s
  • CAT5 Computer Network Cable (preferably the Plenum variety i.e. with teflon-coated, solid-core copper wires)
  • 1 set Speaker Stands (optional)
  • 2 Pairs of Metal “L” Brackets – Reduce to 1 pair, if not using optional speaker stands above
  • Nuts & Bolts (to attach satellite speakers to the “L” brackets of speaker stands and the top MDF board)
  • 4 Particle-board Screws (to fasten the very-light Lepai amplifier to the top MDF board – check that screw head is wide enough to hold down the amp, and that the threaded portion is narrow enough to fit into the amp’s 4 securing slots)
  • Android Phone and/or Netbook/Laptop and/or Tablet (to control your Squeezeplug/Logitech Media Server)
  • 1 Can of Primer
  • 1 Can of Flat Black Paint
  • 1 Paint Tray
  • Paint Brushes/Rollers
  • Fine Wood Sandpaper (220 grit)
  • Drill
  • Drill Press
  • Measuring Tape
  • Metal Hacksaw
  • Metal File

Here’s a picture showing some (not all) of the above parts (click picture to enlarge):

Software Installation and Assembly Instructions:

Dessert first: Tackling the Raspberry Pi

First things first – ensure that your R-Pi is enclosed in its case, so that there’s no risk of it getting damaged/shorted.

Now, with your R-Pi powered off, the next thing you want to do is to connect your powered USB hub to the lower USB port of your R-Pi, and then connect your WiFi dongle to the port above. Note that the WiFi dongle could also be connected to the USB hub (rather than to the R-Pi), which means that the one and only USB device you need connected to your R-Pi is the powered USB hub.

Next, you want to ensure that you connect the following to your powered USB hub:

  • Keyboard and Mouse (or dongle for wireless keyboard/mouse) – optional
  • USB Hard Drive – optional
  • DAC
  • WiFi dongle (if you’ve not connected it directly to your R-Pi’s USB port)

Once that’s done, you may connect the power adapters for your R-Pi and the USB hub to your power extension box.

Give the R-Pi a few moments to start up, and once it’s up, you may proceed to login. Once logged-in you will want to launch a terminal window and issue the following commands:

Building the large Shelving System aka “DIY Flexy Rack”:

The large shelving system is used for the purpose of housing both the bass module of your satellite speaker system, as well as the amplifier, the Raspberry Pi stack, and the satellite speakers.

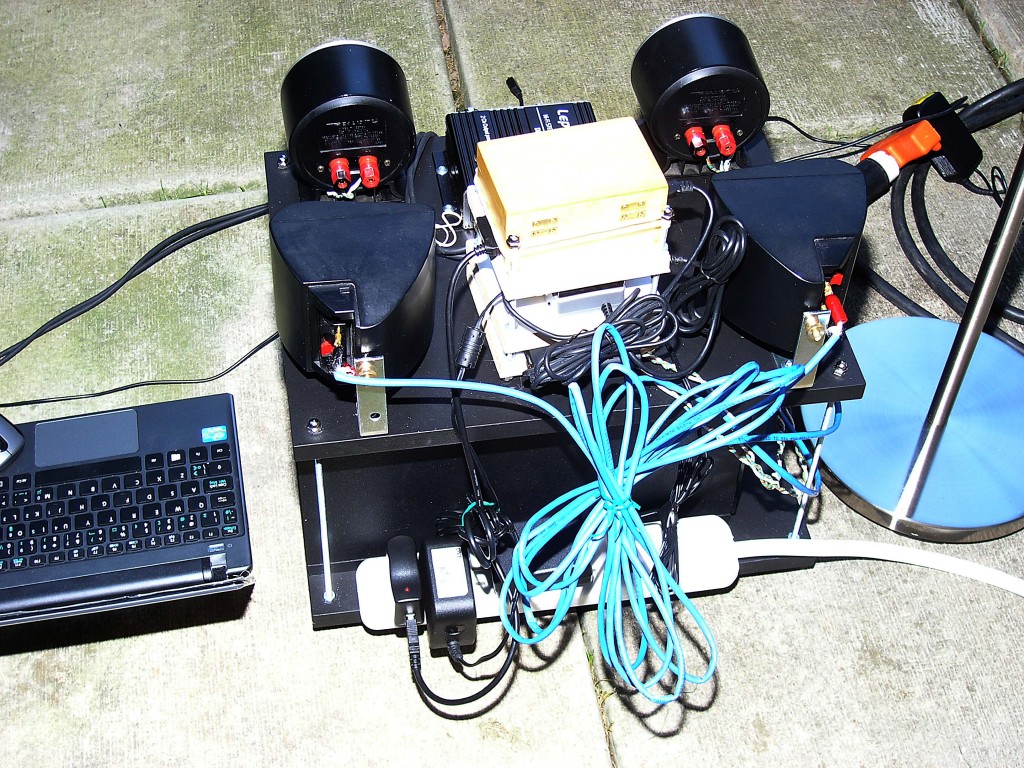
Okay, so let’s begin. From your (large) sheet of MDF, cut two planks that are slight larger than the size of your bass module. This is because you will need space at the back to house the power extension box, as can be seen below:

The next thing you want to do is to give each plank of MDF two coats of primer, sanding in between each coat, as well as after the last coat. Ensure that you sand both faces as well as all four sides.

Once your MDF surfaces are well primed and dry, you will want to start applying the flat black paint. Again, you’ll need to apply at least two coats of black paint, and also ensure that you lightly sand between each coat, as well as after the final coat.

Now it’s time to mark and drill out the required holes. Start off by marking the four corner holes. You only need to mark these holes on one of the racks, since you will now stack one on top of the other (ensuring that they are well-aligned on all sides) and they clamp them down to your workbench and drill the four holes through-and-through using your drill press. Ensure that you use a drill bit that’s slightly wider than the width of your all-thread rod.

You will now want to drill four pilot holes in the corners of the rack that will be as the lower rack. These four holes will be used for the four arrow heads, so again, ensure that the drill bit used is not wider than the width of the threaded portion of your arrow heads. Also ensure that these holes are not drilled through-and-through, but rather just to the depth of the threads.

Once those holes are drilled, you will want to mark holes for your amplifier and satellite speakers. This is to be done on the rack that will be used for the top, so ensure that you set aside the bottom rack (the one on which you drilled four pilot holes in the four corners), so that you don’t end us using that one to drill these holes on. Place your amplifier towards the center of the rack (take measurements if you’re a perfectionist like me) and mark the four spots where the amplifier has slots for securing down. Also place the “L” brackets (either towards the front or rear of your rack) and mark the two holes for each of the two brackets. Now, take your top rack and secure it to your workbench and drill the holes you just marked. Note that you will need to drill pilot holes (of the appropriate width) for the amplifier slots, and wider holes (through-and-through) for the speakers’ “L” brackets.

Now it’s time to cut the all-thread rods to size. Place your lower rack on a table/work-bench and then place your speakers’ bass module on top of the lower rack. Next place the upper rack on top of the bass module and use your measuring tape to measure the height (from top to bottom). Ensure that you add a quarter inch each for both the top and bottom, to allow for regular nuts to be used towards the bottom of the lower rack and acorn nuts to be used towards the top of the upper rack. Once you have that measurement (with the half inch added), use it to cut out four pieces of all-thread rods (using a metal hacksaw). Using your metal file you may want to file the edges of the cut side, to allow for the nuts to be threaded on easily. At this stage you also want to mark two (or more) holes that will allow for securing your power extension box. Take measurements of the holes in your power extension box and ensure that you mark and drill pilot holes appropriately on the top/upper face of your lower rack, behind the bass module. Screw on (only half-way) the appropriate screws.

Grab hold of your bottom rack, flip up over so that the bottom side faces up and screw in the four arrow heads. Make sure you screw it in all the way (till you’re no longer able to see any of the threads). Flip the rack over so that the arrow heads are now in contact with your table/workbench. Put the four all-thread rods into the corner holes and screw on four regular nuts towards the bottom face of the lower rack (where the arrow heads are). Then screw on four more regular nuts towards the top portion of the lower rack. Screw on four more regular nuts, and let them go down about an inch or two (from the very top). Place your bass module on top of your lower rack and then place the upper rack on top of your bass module, ensuring that the all-thread rods go into each of the four corner holes. Once you’re able to see the four protruding all-thread rods, screw on the four acorn nuts. Finally, tighten (screwing upwards) the regular nuts which are towards the bottom face of the upper rack.

With that done, you can now screw down your amplifier, and the two “L” brackets. You may also attach your satellite speakers to the two “L” brackets, and your power extension box to the appropriate screws, behind the bass module.

At this stage, you’ve got your main/larger rack ready, so it’s time to build the smaller rack (which will house the R-Pi and other peripherals).

The idea of the smaller rack (being stand-alone and removable) is that I want to be able to quickly and easily move my R-Pi (with attached peripherals) from the portable setup to my main audio setup (containing floor-standing speakers, tube amp’s, high-end power cables and interconnects etc.) and have my streamed music play on my super-duper-mind-blowing system. When such a move is required, all I have to do is, (a) unplug the Lepai amp’s power adapter, (b) detach the power extension box (from the lower rack), and (c) lift the mini-rack, along with the power extension box and move it to my main rig.

So, without further ado, let’s get down to building the mini-rack, shall we?

Building the Mini-Rack aka “DIY Flexy Rack”:

In order to keep the length of this post more manageable (readable), I created a separate post which details the procedures for building and assembling the mini-rack, to contain your R-Pi stack.

I hear you ask, “How does it sound”?

“Mind Blowing” is all I can say, and that says it all!

You really have to hear it to believe! So what are you waiting for? Go ahead and build yourself one, and let me know how it went.

If you do anything better/different, do let me know about that as well. I’m sure at least some of you will have better tools, skills and experience in painting, woodworking or machining, and that will most certainly help you end up with a much better looking product than mine. Hopefully we can all benefit from your experiences and results.

Cyril Rose

July 2013
M T W T F S S
1234567
891011121314
15161718192021
22232425262728
293031  
    Aug »

Pages

  • Prices and Order Information
  • Photo Gallery
  • Products
    • Line 2CRM Line Preamplifier
    • Phono 3C Phono Preamplifier
    • Super Stealth+ Monobloc Power Amplifier
  • Reviews
  • Contact

Archives

  • Home
  • Prices and Order Information
  • Photo Gallery
  • Products
  • Reviews
  • Contact
  • User Manuals
  • Customer Feedback
Phone Icon

905-903-4565

e-Mail Icon
info@SynergyIntegration.com

Copyright © 2025 Synergy Integration. All rights reserved.

Website developed by Synergy Web Developers (a division of Synergy Integration)