Corporate Logo

Recent Posts

  • 3D Pumpkin Sculptures – Halloween 2017
  • DIY: How to make your own Smartphone Tripod Mount (iPhone or Android)
  • DIY: How to make your own Smartphone Stand (Samsung Galaxy Note 3) – It’s as easy as 1-2-3
  • DIY Tutorial – How to modify and use an Egg Timer for Time-Lapse Videos and Panoramic Photographs
  • DIY Tutorial: How to make a Mini Digital Boombox (sans speakers) for cheap – using a Lepai Amplifier & a Behringer DAC

Categories

  • About Us (1)
  • Audio (3)
  • Fun Stuff (3)
  • Photography (2)

About Me:


I’m an IT Consultant, specializing in:

  • Business Analysis,
  • Business Systems Analysis,
  • Business Intelligence Analysis,
  • Enterprise Reporting & Automation,
  • Business Process Improvement,
  • Microsoft Office Training & Automation,
  • Sage ACT! (CRM) Implmentation & Training,
  • CMS-Based Web Development,
  • Android Automation

You could also say that I’m an Audiophile, with a special interest in tweaking and collecting Vintage Audio. I also enjoy building things myself.

Some of my other interests are:

  • Photography
  • Technology (Linux, Android etc.)
Recent Technology Posts:

No posts found.

Recent Photography Posts:

DIY: How to make your own Smartphone Tripod Mount (iPhone or Android)

DIY Tutorial – How to modify and use an Egg Timer for Time-Lapse Videos and Panoramic Photographs

Recent Audio Posts:

DIY Tutorial: How to make a Mini Digital Boombox (sans speakers) for cheap – using a Lepai Amplifier & a Behringer DAC

Tutorial: How to setup an Awesome-Sounding, More-Portable, Open Boombox using a Raspberry Pi and Squeezeplug (v2)

Tutorial: How to setup an Awesome-Sounding, Semi-Portable, Open Boombox using a Raspberry Pi and Squeezeplug (v1)

Some Fun Stuff :-)

3D Pumpkin Sculptures – Halloween 2017

DIY: How to make your own Smartphone Stand (Samsung Galaxy Note 3) – It’s as easy as 1-2-3

Stress Busters – 80’s Retro Games

  • Home
  • Prices and Order Information
  • Photo Gallery
  • Products
    • Line 2CRM Line Preamplifier
    • Phono 3C Phono Preamplifier
    • Super Stealth+ Monobloc Power Amplifier
  • Reviews
  • Contact
  • User Manuals
  • Customer Feedback

DIY Tutorial: How to make a Mini Digital Boombox (sans speakers) for cheap – using a Lepai Amplifier & a Behringer DAC

Okay folks, in this tutorial I’m gonna show you how to make an ultra-portable, mini, digital boombox (sans speakers).

The idea here is that you can very easily carry this (boombox) around and connect it up to any set of speakers and a digital source such as a tablet, smartphone, Raspberry Pi (running XBMC or Squeezeplug), and enjoy quality music, where-ever, when-ever.

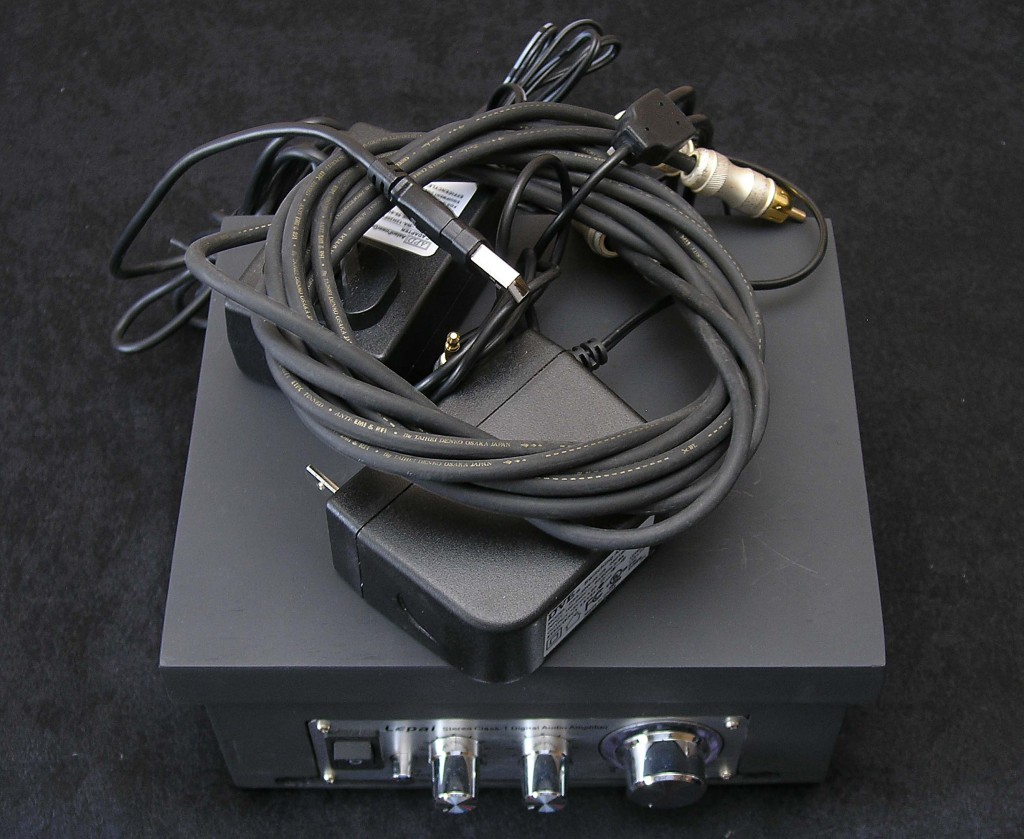
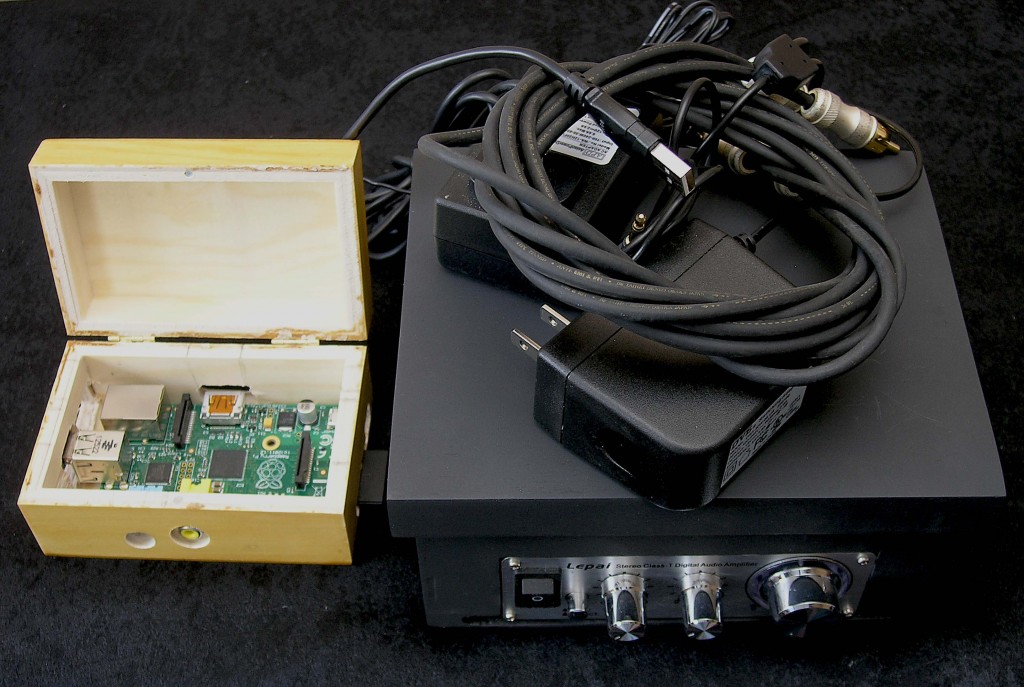
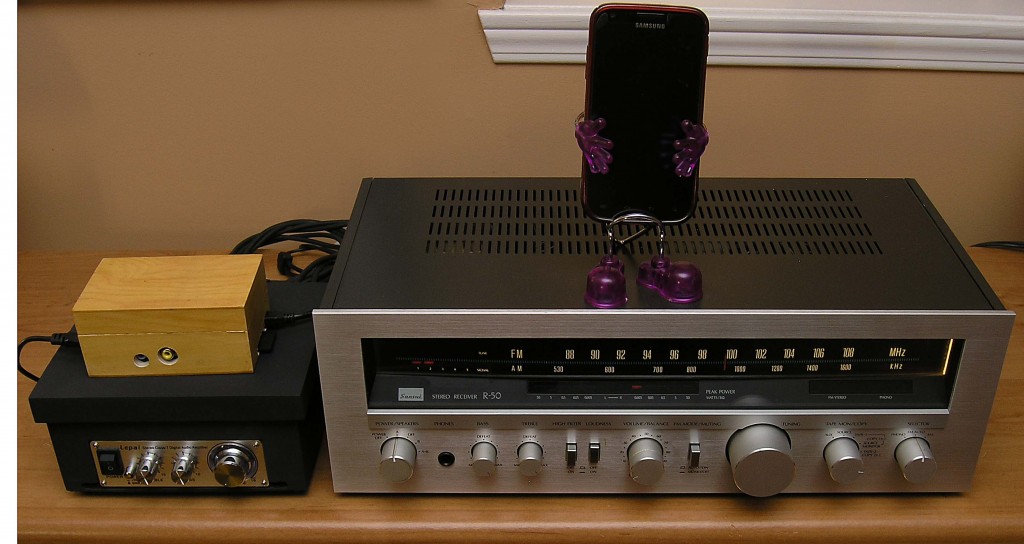
What you should end up with is a mini boombox similar to the one in the picture below – the black box, that is. Okay, I know! You can’t really call it a boombox (since it doesn’t have any speakers attached to it), but the great thing is that you can pair it up with any speakers you have lying around.

Notice that I have both my smartphone as well as a Raspberry Pi (in the picture above) and this is only because I’m using the smartphone as a Squeezeplug remote to control the music. I could very well have had only my phone connected to the Lepai amp (which means I’d only require the setup shown below), and I’d be able to play the songs off of my phone/USB storage device(s).

Also note that even though I have my Sansui receiver (in the first picture above), it’s not really a requirement for this project – since the mini boombox has it’s own mini amplifier, the wonderful Lepai Tripath TA-2020A+. That being said, I do prefer to hear my music through the Sansui receiver (at least while I’m listening at home).

The sound of this setup is so mind-blowingly awesome that it will blow your mind (duh!). Yep, for some reason this setup sounds way, way better than even my basement setup, which includes a tube-based setup of a vintage Heathkit power-amp, and a vintage Dynaco pre-amp, connected to a pair of vintage Wharfedale speakers (with 10″ woofers).

Oh, by the way (and in case you may be wondering), the speakers that I have connected to my Sansui receiver are JBL’s (with 8″ woofers).

This mini-boombox has now gone on to both encase the Lepai amplifier, as well as enclose the components contained within the shelves of the mini audio-racks shown in this project of mine. I much prefer this concealed look, as compared to the exposed look of the earlier project.

Building your own Mini-Boombox

All right, so let’s get down to the business of showing you how to build this mini-boombox for yourself.

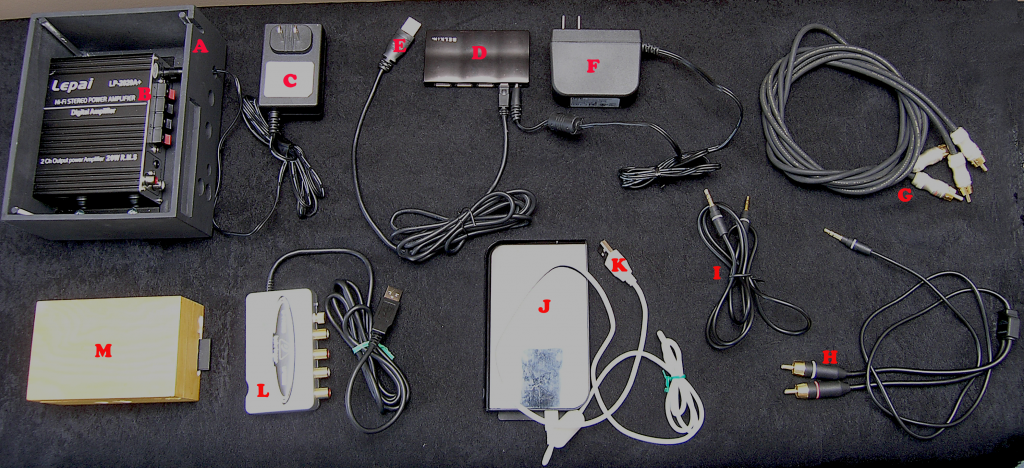
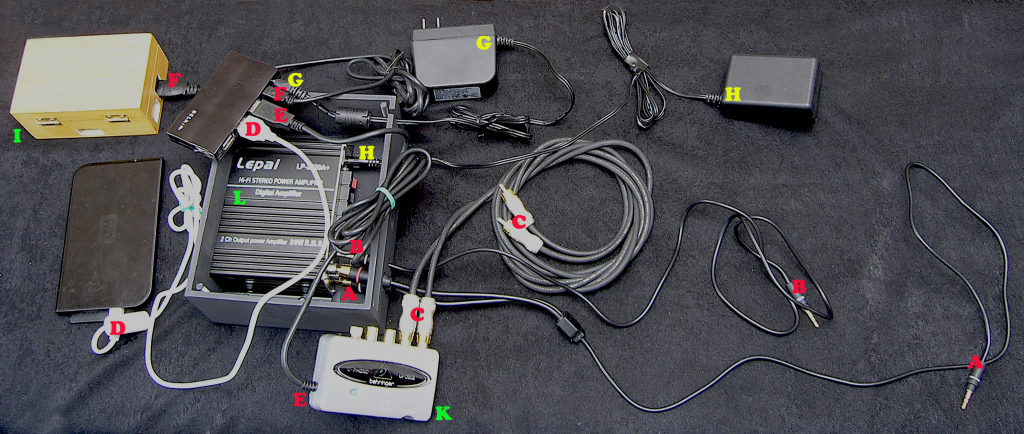
Things you’ll need

  • [A] – Rectangular Wooden Box – Available at Dollarama (Canada) for $3, and sold as a set of 3 nested boxes
  • [B] & [C] – Lepai Tripath TA-2020A+ Amplifier with Power Supply
  • [D], [E] & [F] – Self-powered USB Hub with USB Cable and Power Supply
  • [G] – RCA Audio Cables (Optional – only if using a separate amp/receiver)
  • [H] – Mini-Audio Stereo to RCA Audio Cable
  • [I] – Mini-Audio Stereo Cable
  • [J] & [K] – USB Hard Drive with USB Cable (Optional)
  • [L] – Behringer UFO-202 DAC (Digital-To-Analog-Converter)
  • [M] – Raspberry Pi with USB Cable (optional)
  • All-thread Rods
  • 8 Nos. Regular Nuts to fit all-thread rod
  • 4 Nos. Acorn Nuts to fit all-thread rod
  • 4 Nos. Super Strong, Rare-Earth Magnets 1/4 inch
  • Drill with various size Bits
  • Dremel or similar Rotary Tool with a variety of bits

Cutting-out the box – Front Face

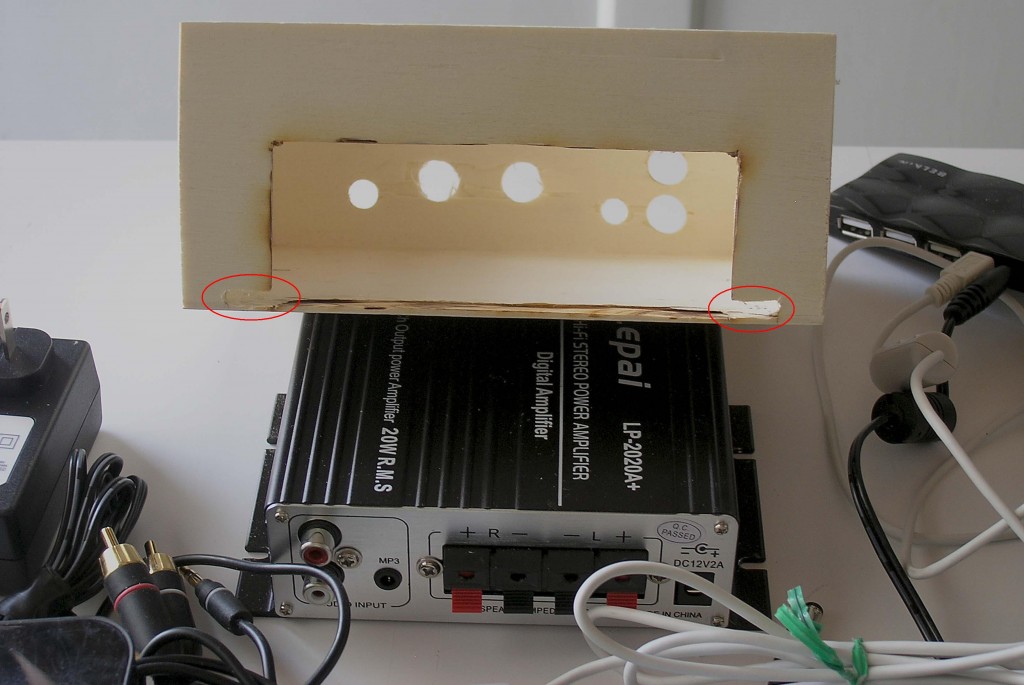
To start off, put your Lepai amplifier into the box and center it as accurately as possible. Then hold it steady and take measurements for the height and width. Once you have those measurements, use a pencil and draw the rectangular shape on the outside front face of the box. Then take your rotary tool and start cutting out the rectangle by using an appropriate cutting bit. After the rectangle is cut, remember to cut two quarter inch slits towards the bottom, on either side of the amplifier (shown circled red in the picture below). This is required in order for the amplifier to be pushed outwards slightly, so that it stays flush with the outside face of the wooden box.

Cutting-out the box – Rear Face

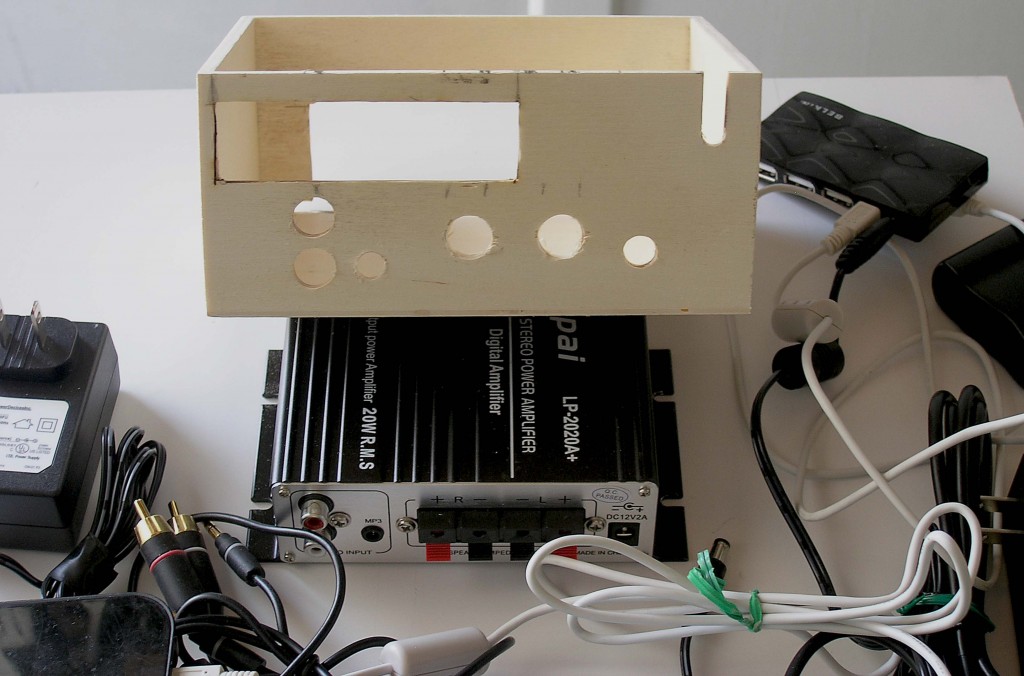
With the amplifier still held firmly in place (inside the box), bring it to eye-level and use your pencil to mark cut-outs for the following (going from left to right, top to bottom):

  • Behringer UFO-202 DAC (take measurements if required)
  • Other Wires which require external connections
  • RCA Inputs (Right and Left)
  • MP3 Input
  • Speaker Wires (Right Channel)
  • Speaker Wires (Left Channel)
  • Power Supply (Lepai Amplifier)

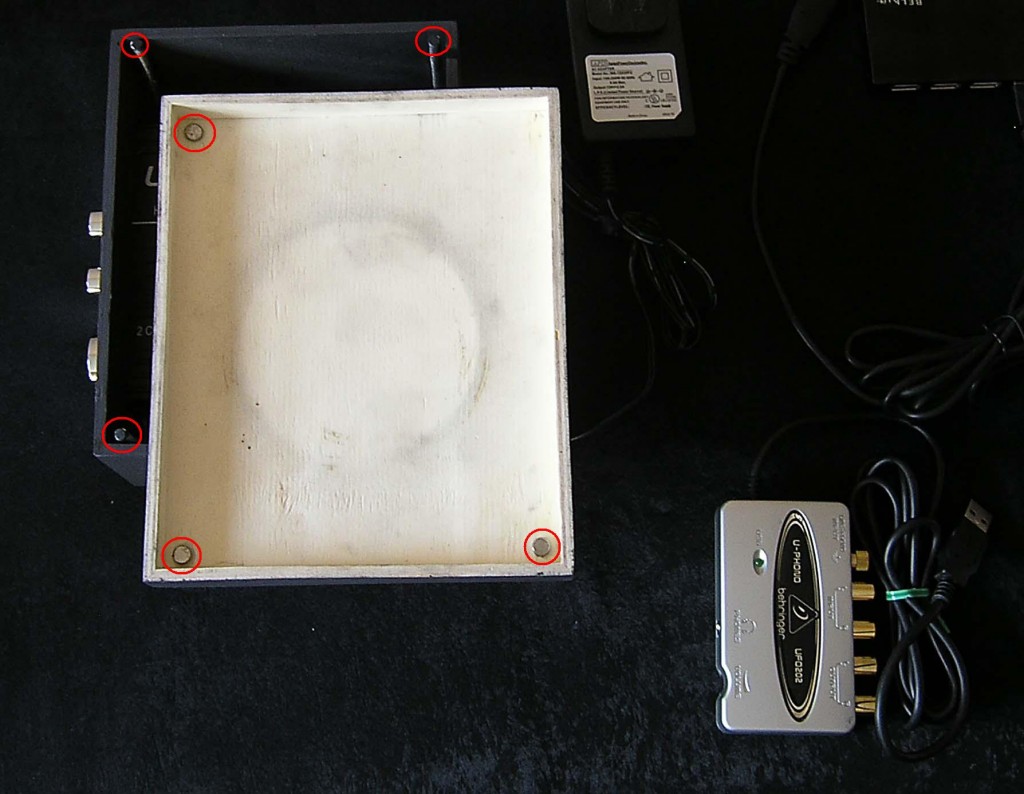
With that done, you will now need to drill four holes in each inside bottom corner of the box. These holes will be used in order to secure four all-thread rods in place, and the all-thread rods are (in-turn) used for the following two purposes:

  1. To provide feet for the mini-boombox
  2. To provide a means to secure the lid to the box (using magnets), while still allowing easy access to the components insde

The picture below shows the circled all-thread rods (in the black-box) and the super-strong, rare-earth magnets (glued to each corner of the lid).

With all of the cut-outs completed, you may now go ahead and paint (or stain, if that’s what you prefer) your mini-boombox. I chose to paint it a dull black in order to both conceal all pencil markings, as well as to not show any brush/roller imperfections (which tends to show easily with glossy paint or stain).

Putting things together

Once the paint/stain has dried, you may proceed to secure the amplifier to the inside of the box by means of four screws. After securing the amplifier in place, go ahead and insert the DAC into its rectangular slot at the rear. With that in place you will now want to drop in your hard drive, and ensure that it sits flush with the top of the amplifier. This will allow for your powered USB hub (which goes in next) to just about reach the top of your box (assuming you’re using the same one as I did), and allow for the lid to close evenly.

Now, ensure that the USB cables for both your hard drive, as well as the DAC remain inside the box, since they need to be connected to the powered USB hub. The only USB cable that should exit out of the box (via the rear top-right opening) is the one from the USB hub, and it will end up in one of the USB ports of your Raspberry Pi (if you’re using one).

The above being said, there may be times when you would want to attach the hard drive directly to your phone (assuming it’s a rooted android phone which supports USB-OTG), in order to access the 100’s of gigabytes of music you might have on the drive. That’s when you will want to have the hard drives’ USB cable exit out the rear opening, in order to attach it to your USB-OTG cable.

Needless to say, the power supply for the USB hub must also exit the box, in order to connect to your power source and provide power to the hub.

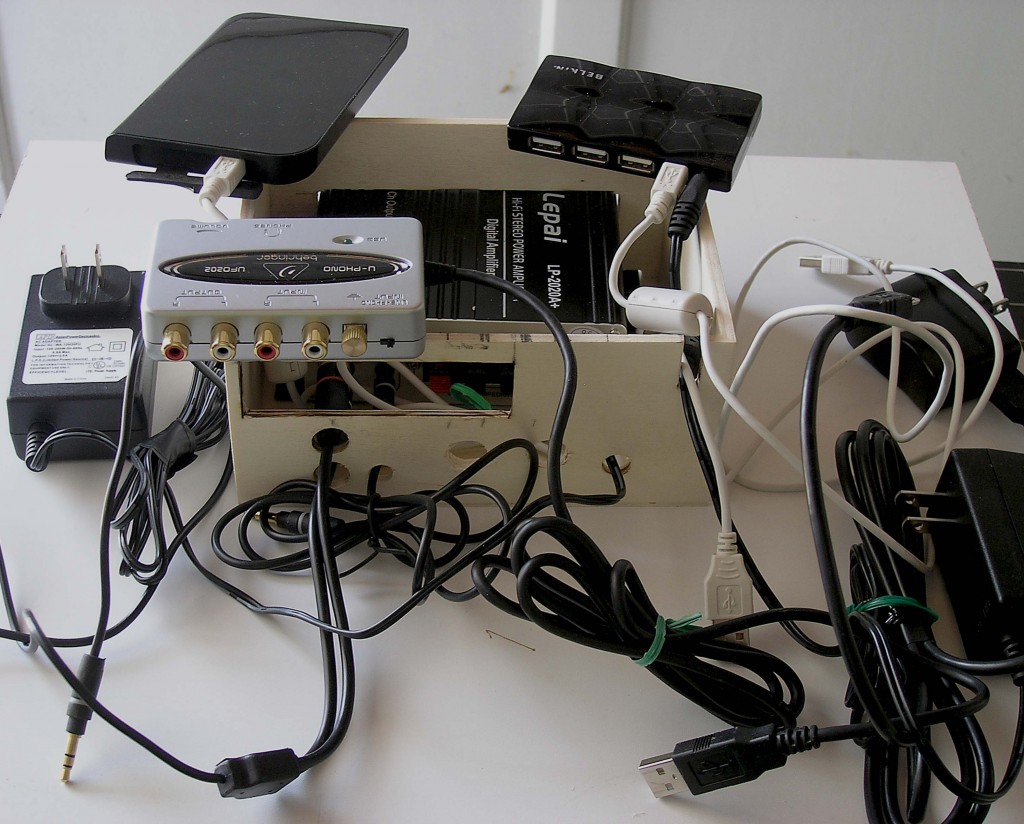
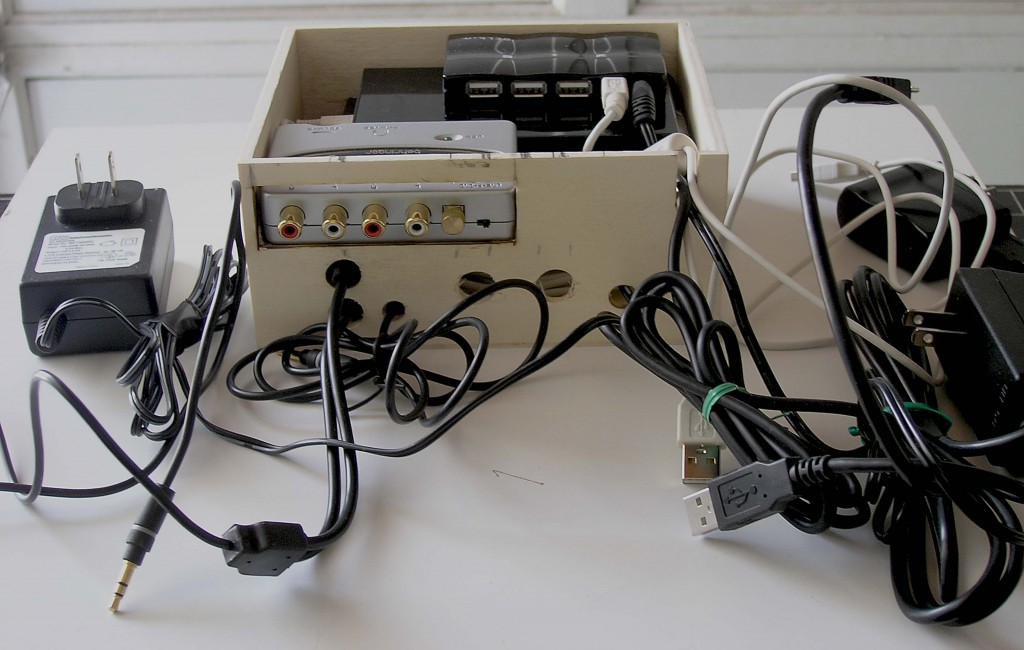
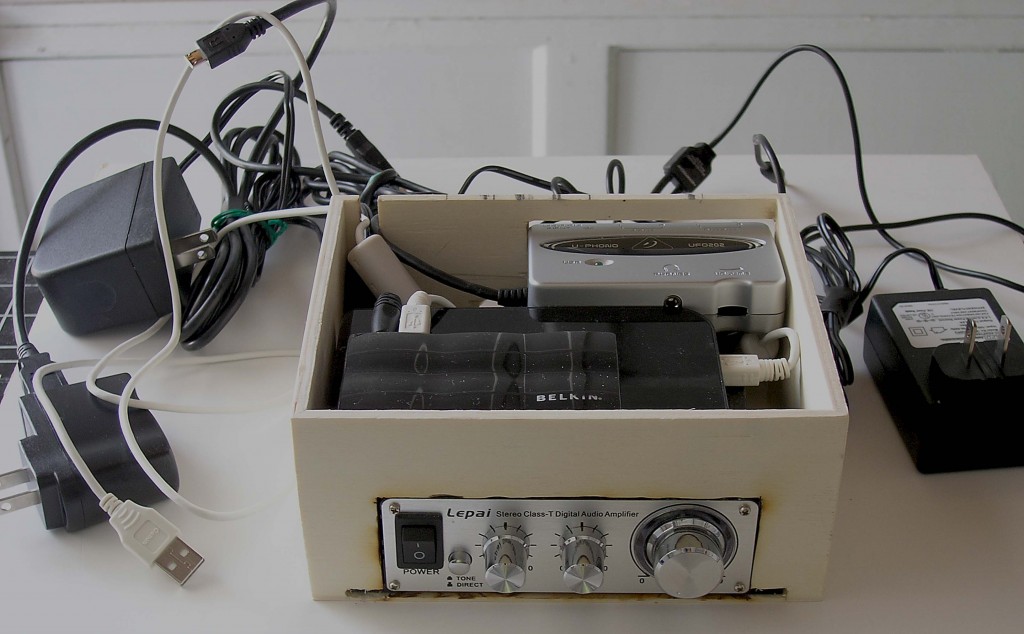
Now, let’s show you how all of these components are laid out inside the black box. Okay, first off, the amplifier is screwed down to the bottom of the box. The next component you want to put in place is the DAC, and ensure that it’s held securely in the opening. Once that’s installed, you then want to lay down your hard drive over the top of the amplifier, and to the front of your DAC. Remember to keep the USB cables of both the DAC as well as the hard drive inside the box, since they connect up to the USB ports of your powerd USB hub. Next up is the USB hub, which is laid on top of the hard drive, towards the front of the box. The USB cable of the hub must exit out the box (if you’re connecting it to a Raspberry Pi), as must the power supply cable.

The following two pictures show you a front and rear view of how things are laid out internally.

Now, if (like myself) you have a Raspberry Pi (with SqueezePlug installed on it) you could very well pair that up with this mini-boombox that we’re building, and then connect the two to your favourite speakers and you’re good to go. If you decide to go that route, you will have a setup similar to the one in the picture below.

Here once again is how my setup looks, without my floor-standing speakers in the picture though.

And, how about sitting back and enjoying my setup in action (in the following video)?:

Okay, so what are you waiting for? Go ahead and build yourself one of these little puppies, and let me know how it went.

If you do anything better/different, do let me know about that as well.

I’m sure at least some of you will have better tools, skills and experience in painting, woodworking or machining, and that will most certainly help you end up with a much better looking product than mine. Hopefully we can all benefit from each others’ experiences and results.

Cyril Rose

This entry was posted on Monday, October 7th, 2013 at 2:13 pm by cyrilrose and is filed under Audio. You can follow any responses to this entry through the RSS 2.0 feed. You can leave a response, or trackback from your own site.

Leave a Reply Cancel reply

Your email address will not be published. Required fields are marked *

« Previous Post

Next Post »

May 2025
M T W T F S S
 1234
567891011
12131415161718
19202122232425
262728293031  
« Nov    

Pages

  • Prices and Order Information
  • Photo Gallery
  • Products
    • Line 2CRM Line Preamplifier
    • Phono 3C Phono Preamplifier
    • Super Stealth+ Monobloc Power Amplifier
  • Reviews
  • Contact

Archives

  • Home
  • Prices and Order Information
  • Photo Gallery
  • Products
  • Reviews
  • Contact
  • User Manuals
  • Customer Feedback
Phone Icon

905-903-4565

e-Mail Icon
info@SynergyIntegration.com

Copyright © 2025 Synergy Integration. All rights reserved.

Website developed by Synergy Web Developers (a division of Synergy Integration)